
Guide for Transferring Cryptocurrency to the Trezor iOS App for Secure Cold Storage
When it comes to securing your cryptocurrency, cold storage is often considered the safest option. And one popular choice for cold storage is the Trezor hardware wallet. But did you know that you can also use the Trezor iOS app to securely store your crypto assets? In this guide, we’ll walk you through the steps of transferring your crypto to the Trezor iOS app for cold storage.
First, make sure you have the latest version of the Trezor iOS app installed on your iPhone or iPad. You can download the app from the App Store and follow the installation instructions. Once you have the app installed, open it and set up your Trezor device by following the on-screen instructions.
Next, connect your Trezor device to your iPhone or iPad using the USB cable provided. Make sure the device is properly connected and recognized by the app. If prompted, enter your PIN code on the Trezor device to authorize the connection.
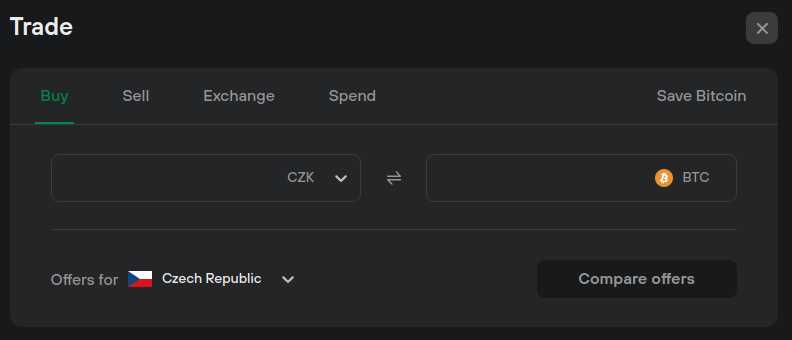
Now, on the Trezor iOS app, navigate to the “Receive” section. Here, you will find a list of supported cryptocurrencies. Select the cryptocurrency you want to transfer to your Trezor device and tap on it. You will see a unique address generated for that particular cryptocurrency. This is the address you will use to transfer your crypto assets.
Finally, open your existing cryptocurrency wallet or exchange account and initiate a withdrawal to the address generated by the Trezor iOS app. Make sure to double-check the address before confirming the transaction. Once the transaction is confirmed, your crypto assets will be securely stored on your Trezor device via the iOS app.
Remember to regularly check for software updates and security patches for both the Trezor iOS app and your Trezor hardware device. By following these steps and maintaining good security practices, you can be confident that your crypto assets are well protected in cold storage using the Trezor iOS app.
Step-by-Step Guide: Transferring Crypto to Trezor iOS App for Cold Storage
Transferring your cryptocurrency to a cold storage solution like the Trezor iOS app adds an extra layer of security to your holdings. Follow this step-by-step guide to transfer your crypto to the Trezor iOS app for safekeeping.
Step 1: Install the Trezor App
Start by downloading and installing the Trezor app from the App Store on your iOS device. Make sure to only download the official app from the Trezor website or trusted sources to avoid phishing attempts.
Step 2: Set Up Your Trezor Device
If you haven’t set up your Trezor hardware wallet yet, follow the instructions that come with the device to set it up. Make sure to choose a strong and unique PIN code and securely back up your recovery seed.
Step 3: Connect your Trezor Device to the App
Connect your Trezor device to your iOS device using the provided USB cable or adapter. Open the Trezor app you installed in Step 1 and follow the prompts to connect your device to the app.
Step 4: Select your Cryptocurrency Asset
On the Trezor app, select the cryptocurrency asset you want to transfer from the list of available options. Make sure you have the corresponding wallet for that asset installed on your Trezor device.
Step 5: Generate a Receiving Address
Click on the “Receive” or “Receive Funds” button on the Trezor app interface to generate a receiving address for your selected cryptocurrency. Make a note of this address as you will need it in the next step.
Step 6: Initiate the Transfer
Open the wallet or exchange where your cryptocurrency is currently stored. Navigate to the withdrawal or send option and enter the previously generated receiving address as the destination for the transfer.
Step 7: Confirm the Transfer
Carefully review the details of the transfer, including the receiving address and the amount to be transferred. Once you have confirmed that the information is correct, initiate the transfer and wait for the confirmation on the sending side.
Step 8: Verify the Transfer on your Trezor Device
After the transfer is confirmed on the sending side, disconnect your Trezor device from the iOS device. Connect it to a trusted computer and open the Trezor interface. Verify that the transferred funds are reflected in your Trezor wallet for the respective cryptocurrency.
Step 9: Safely Store your Trezor Device
Once the transfer is successfully completed, store your Trezor device in a secure location, such as a safe or safety deposit box. Make sure to keep your PIN code and recovery seed separate from the device and store them in a different secure location.
By following these step-by-step instructions, you can confidently transfer your cryptocurrency to the Trezor iOS app for cold storage, ensuring the highest level of security for your digital assets.
Set Up Your Trezor iOS App
If you want to transfer and store your crypto on your Trezor device using your iOS app, you’ll need to set it up first. Follow these steps to get started:
Step 1: Download the Trezor iOS App
Firstly, you’ll need to download the Trezor iOS app from the App Store. Search for “Trezor” and look for the official app developed by Trezor.io. Once you’ve found it, tap on “Install” to download and install it on your iPhone or iPad.
Step 2: Create a New Wallet
After installing the app, open it and select “Create a new wallet” on the home screen. Follow the prompts to set up your new wallet. Make sure to choose a strong and secure passphrase when prompted, as this will be your additional layer of protection against unauthorized access.
Note: It is highly recommended to use a hardware wallet like Trezor for cold storage as it provides an extra layer of security by keeping your private keys offline.
Step 3: Connect Your Trezor Device
Once your wallet is set up, connect your Trezor device to your iOS device using the provided USB cable. Follow the on-screen instructions to complete the connection. You may need to enter your device PIN to authorize the connection.
Your Trezor device should now be recognized by the app, and you can proceed with managing your crypto assets.
Remember to always double-check the cryptocurrency addresses before making any transactions and keep your recovery seed safe to ensure access to your funds in case of loss or damage to your device.
Now that your Trezor iOS app is set up, you can transfer your crypto assets to your Trezor device for secure cold storage.
Generate a Receiving Address in Trezor iOS App
To securely store your cryptocurrencies in cold storage using the Trezor iOS app, you first need to generate a receiving address. Follow these simple steps to generate a receiving address:
- Open the Trezor iOS app on your device.
- Connect your Trezor hardware wallet to your device using the USB cable.
- Tap on the “Receive” tab in the app.
- Select the cryptocurrency you want to receive from the list.
- Double-check that your Trezor device screen displays the same cryptocurrency and address as shown on the app.
- Click on the “Generate new address” button.
- A new address will be generated for you to receive funds. You can copy the address by clicking on the “Copy to clipboard” button.
Now you have successfully generated a receiving address using the Trezor iOS app. You can share this address with others to receive cryptocurrency securely into your Trezor hardware wallet for cold storage.
Send Crypto to Your Trezor iOS App
Once you have set up your Trezor iOS app for cold storage, you can start transferring cryptocurrencies to it for safekeeping. The process is simple and secure, allowing you to have full control over your funds.
Step 1: Open the Trezor iOS App
Launch the Trezor iOS app on your device. Enter your PIN and passphrase (if applicable) to unlock your wallet.
Step 2: Navigate to the Receive Section
Inside the Trezor iOS app, find the “Receive” section and tap on it. Here, you will see a list of supported cryptocurrencies that can be received.
Step 3: Choose a Cryptocurrency
Select the specific cryptocurrency that you want to send to your Trezor iOS app. The app will generate a unique receiving address for that particular cryptocurrency.
Step 4: Copy the Receiving Address
Tap on the generated receiving address to copy it to your device’s clipboard. You can also use the “Share” button to send the address via chat or email.
Step 5: Send Cryptocurrency from Your Exchange or Wallet
Open your cryptocurrency exchange or wallet that holds the funds you want to transfer. Initiate a withdrawal or send transaction and paste the receiving address from your clipboard into the appropriate field. Double-check the address to ensure accuracy.
Step 6: Confirm the Transaction
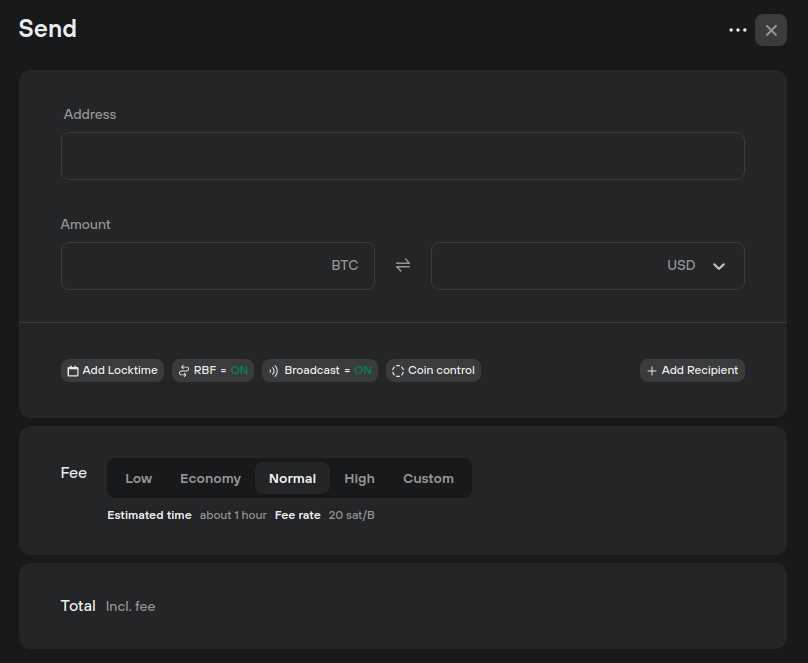
Follow the necessary steps to confirm the transaction on your cryptocurrency exchange or wallet. This may include verifying transaction details, entering 2FA codes, or providing other necessary authentication.
Once the transaction is confirmed, the cryptocurrency will be sent to your Trezor iOS app and will be securely stored in your cold storage wallet. You can navigate back to the Trezor iOS app to view your balance and transaction history.
Remember to always double-check the receiving address and use caution when transferring cryptocurrency. It is recommended to test your first transfer with a small amount to ensure everything is working correctly before sending larger amounts.
Verify the Transaction and Safely Store Your Crypto
After transferring your crypto to your Trezor iOS app for cold storage, it is crucial to verify the transaction and take steps to securely store your crypto. Here are some important steps you should follow:
1. Verify the Transaction Details
Before considering the transaction complete, it is essential to verify all the transaction details. Check the amount of crypto transferred, the sender’s and recipient’s addresses, and any transaction fees charged. Make sure that all the information is accurate and matches your intent.
2. Verify the Transaction on the Blockchain
Using the blockchain explorer, verify the transaction by searching for the transaction hash or the addresses involved. Confirm that the transaction has been successfully recorded on the blockchain with the correct details. This provides an additional layer of verification and ensures the integrity of the transaction.
3. Safely Store Your Crypto
Once the transaction is verified, it is important to take steps to safely store your crypto. Consider the following measures:
- Back up your wallet: Ensure that you have securely backed up your wallet’s recovery seed or private keys. This will enable you to recover your funds in case of loss or theft.
- Use a secure environment: Make sure to access your wallet and manage your crypto in a secure and trusted environment. Avoid using public Wi-Fi networks or unsecured devices.
- Consider hardware wallets: Hardware wallets, such as Trezor, provide an extra layer of security by storing your private keys offline. Consider using a hardware wallet for long-term storage of your crypto.
- Keep your information private: Be cautious about sharing your wallet addresses or any sensitive information related to your crypto holdings. Keep this information confidential to minimize the risk of targeted attacks.
- Regularly update your security measures: Stay vigilant and keep your wallet software and firmware up to date. Developers often release security updates to address any vulnerabilities.
By following these steps, you can ensure the safety and security of your crypto assets stored in your Trezor iOS app. Always prioritize security and make informed decisions when managing your cryptocurrencies.
Q&A:
Can I transfer my cryptocurrency to the Trezor iOS app for cold storage?
Yes, you can transfer your cryptocurrency to the Trezor iOS app for cold storage. The Trezor iOS app allows you to securely store your cryptocurrencies offline, providing an extra layer of protection against hackers and other security threats.
How can I transfer my cryptocurrency to the Trezor iOS app?
To transfer your cryptocurrency to the Trezor iOS app, you will first need to connect your Trezor device to your iPhone or iPad using the provided USB cable. Once connected, open the Trezor app on your device and select the cryptocurrency you wish to transfer. Follow the on-screen instructions to generate a receiving address for your cryptocurrency and then use your existing wallet or exchange account to send the funds to that address.


