
A Comprehensive Guide to Setting Up and Using Trezor Algorand
Welcome to our comprehensive guide on setting up and using Trezor Algorand. As the world of cryptocurrency continues to evolve, it is crucial to ensure the security of your digital assets. Trezor Algorand provides a reliable and user-friendly solution for storing your Algorand tokens safely.
Whether you are new to the world of cryptocurrency or an experienced investor, this guide will walk you through the step-by-step process of setting up your Trezor Algorand device. We will cover everything from the initial setup to securing your funds and managing your transactions.
With its advanced security features and intuitive interface, Trezor Algorand is the perfect choice for individuals who value the privacy and security of their digital assets. By the end of this guide, you will have a clear understanding of how to protect and manage your Algorand tokens using the Trezor hardware wallet.
So, let’s dive in and explore the world of Trezor Algorand, ensuring the highest level of security for your Algorand tokens.
What is Trezor Algorand?
Trezor Algorand is a hardware wallet that offers secure storage and management of Algorand (ALGO) cryptocurrency. Algorand is a blockchain platform that aims to provide high transaction speed and scalability while maintaining security and decentralization.
Trezor Algorand allows users to securely store their ALGO tokens offline, protecting them from potential hacking or theft. The wallet features a built-in display that allows users to verify transactions before signing them, ensuring that they are sending funds to the intended recipient.
In addition to storage, Trezor Algorand also provides a user-friendly interface for managing ALGO tokens. Users can easily send and receive tokens, view their transaction history, and connect to compatible Algorand wallets and dApps. The wallet can be accessed through a USB connection to a computer or mobile device.
Trezor Algorand is backed by the well-established Trezor brand, known for its security expertise and commitment to user privacy. The wallet is built using open-source software, which allows for transparency and community auditing. It supports multi-currency storage, allowing users to manage different cryptocurrencies in one device.
| Features | Benefits |
|---|---|
| Secure offline storage | Protection against hacking and theft |
| Built-in display | Transaction verification |
| User-friendly interface | Easy management of ALGO tokens |
| Supported by Trezor | Trusted brand with security expertise |
| Open-source software | Transparency and community auditing |
| Multi-currency support | Manage different cryptocurrencies in one device |
Setting up Trezor Algorand
Setting up Trezor Algorand is a straightforward process that involves a few simple steps. By following these steps, you can securely store your Algorand (ALGO) cryptocurrency and ensure that your funds are protected.
Step 1: Get a Trezor device
The first step in setting up Trezor Algorand is to acquire a Trezor hardware wallet device. Trezor is one of the most reputable brands in the cryptocurrency industry and offers excellent security features for storing various digital assets, including Algorand.
Step 2: Connect your Trezor device

Once you have your Trezor device, connect it to your computer using a USB cable. Make sure to use a trusted USB cable to avoid any potential security risks.
Step 3: Install Trezor Bridge
To enable communication between your Trezor device and your computer, you need to install Trezor Bridge. Trezor Bridge is an application that allows your computer to recognize and interact with your Trezor device.
You can download the Trezor Bridge application from the official Trezor website. Follow the installation instructions provided by the application to complete the process.
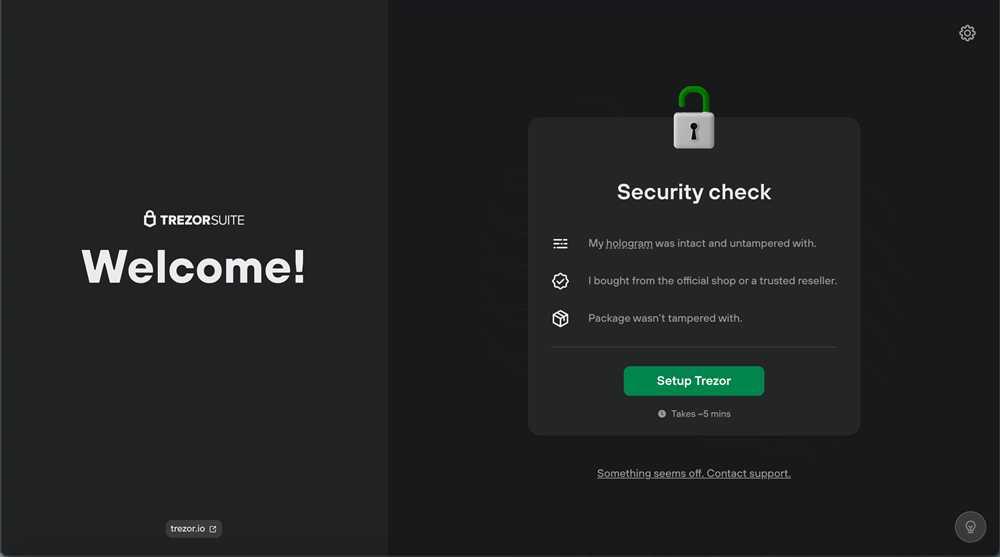
Step 4: Set up your Trezor device
Once you have installed Trezor Bridge, you can proceed to set up your Trezor device. To do this, follow the on-screen instructions provided by the Trezor Bridge application.
During the setup process, you will be prompted to create a new wallet or recover an existing one. If you are setting up your Trezor device for the first time, choose the option to create a new wallet.
Step 5: Configure Algorand on your Trezor device
After setting up your Trezor device, you need to configure Algorand on it. To do this, access the Trezor Wallet interface from your computer and select Algorand from the list of supported cryptocurrencies.
Follow the on-screen instructions to configure Algorand on your Trezor device. This includes creating an Algorand account and generating a new receiving address for your ALGO tokens.
Step 6: Transfer ALGO to your Trezor device
Once Algorand is successfully configured on your Trezor device, you can transfer your ALGO tokens to it. Obtain the receiving address generated by your Trezor device and use it to send your ALGO tokens from your existing wallet or exchange account.
Make sure to double-check the receiving address before initiating the transaction to avoid any loss of funds. It is recommended to start with a small amount of ALGO to ensure that the transaction goes smoothly.
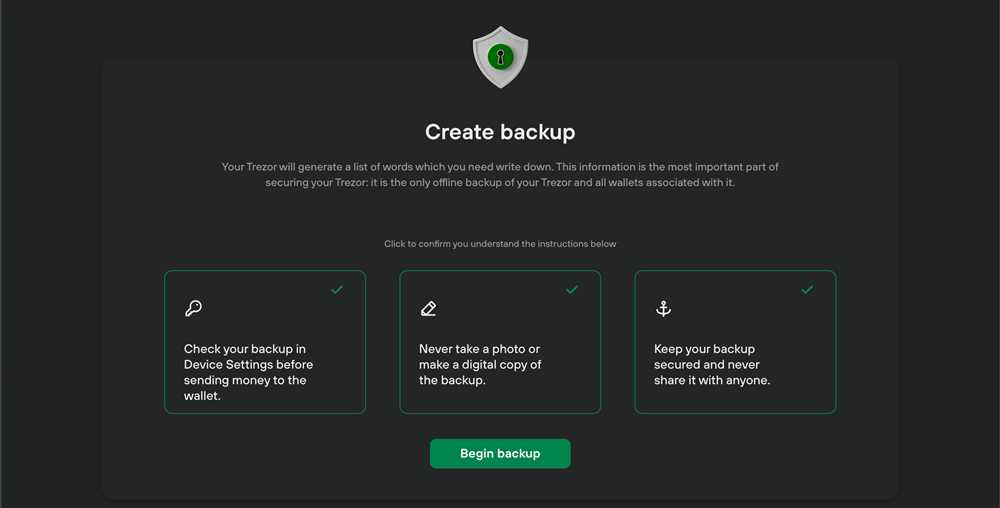
Step 7: Secure and back up your Trezor device
After transferring your ALGO tokens to your Trezor device, it is crucial to secure and back up your device. Follow the instructions provided by Trezor to set up a PIN code and create a recovery seed.
Store your recovery seed in a secure location and ensure that it is not accessible to anyone else. Losing your recovery seed could result in permanent loss of access to your funds.
It is also advisable to enable additional security measures, such as passphrase encryption, for an added layer of protection.
Congratulations! You have successfully set up your Trezor device for Algorand. Your ALGO tokens are now securely stored and protected. Remember to keep your Trezor device and recovery seed safe to maintain control of your funds.
Using Trezor Algorand
Trezor Algorand is a secure hardware wallet that allows you to store and manage your Algorand assets offline. Here is a step-by-step guide on how to set up and use Trezor Algorand:
Setting Up Trezor Algorand
1. Purchase a Trezor Algorand hardware wallet from the official website.
2. Unbox the package and make sure all the accessories are included.
3. Connect your Trezor Algorand to your computer using the USB cable.
4. Follow the instructions on the Trezor website to install the necessary firmware and software.
5. Set a strong PIN code for your Trezor Algorand.
6. Generate a recovery seed and write it down in a safe place.
Managing Algorand Assets
1. Open the Algorand wallet app on your computer.
2. Connect your Trezor Algorand to your computer using the USB cable.
3. Enter your PIN code on the Trezor device.
4. In the wallet app, click on the “Connect with Trezor” button.
5. Follow the on-screen instructions to complete the connection.
6. Once connected, you can view your Algorand balances and transaction history.
7. To send Algorand, click on the “Send” button and enter the recipient’s address.
8. Confirm the transaction details on your Trezor device and approve the transaction.
Additional Features
Trezor Algorand offers additional features and security measures, such as:
| Passphrase Management | Add an extra layer of security by setting up a passphrase for your Trezor Algorand. |
| Address Labeling | You can label your Algorand addresses to easily identify them. |
| Multi-Account Support | Create multiple accounts within your Trezor Algorand to organize your assets. |
| Account Recovery | In case you lose your Trezor device, you can recover your assets using the recovery seed. |
By following these steps and utilizing the additional features, you can securely manage your Algorand assets using Trezor Algorand. Remember to always keep your recovery seed and PIN code safe to protect your funds.
Tips for Securely Storing Algorand on Trezor

Storing your Algorand (ALGO) securely on your Trezor hardware wallet is crucial to ensure the safety of your digital assets. Here are some tips to help you securely store your Algorand on Trezor:
1. Set up your Trezor securely:
Before storing Algorand on your Trezor, make sure you have set up your hardware wallet correctly. Follow the instructions provided by Trezor to create a strong and unique PIN, enable a passphrase, and back up your recovery seed offline. This will add an extra layer of security to your wallet.
2. Double-check addresses:
When sending or receiving Algorand, always double-check the recipient’s address. The Trezor display will show you the exact address where the transaction is being sent. This helps prevent accidental transfers to the wrong address and ensures that your ALGO tokens are sent to the intended recipient.
3. Use multiple accounts:
Trezor allows you to create multiple accounts within the same wallet. Consider creating separate accounts for different purposes or different amounts of Algorand. This way, you can keep your funds organized and limit potential losses if one account is compromised.
4. Enable a strong passphrase:
Trezor supports the use of a passphrase, which acts as an additional layer of security. Make sure to enable this feature and choose a strong passphrase that is not easily guessable. Remember to store your passphrase offline and separately from your Trezor device for added safety.
5. Regularly update firmware:
Keep your Trezor device up to date by installing the latest firmware updates. These updates often include security fixes and new features to enhance the overall security of your wallet. Check the Trezor website regularly for firmware updates and apply them promptly.
6. Be cautious with public Wi-Fi:
Avoid using public Wi-Fi networks when accessing your Trezor wallet. Public Wi-Fi networks are often insecure and can expose your wallet to potential attacks. Instead, use a trusted and secure internet connection to access your wallet and perform Algorand transactions.
7. Keep backups offline:
Always keep backups of your Trezor recovery seed offline and in a safe place. This way, even if your Trezor device is lost, stolen, or damaged, you can still recover your Algorand funds using the recovery seed. Ensure that your backups are properly stored and protected from unauthorized access.
By following these tips, you can enhance the security of your Algorand holdings stored on your Trezor hardware wallet. Remember to stay vigilant and take necessary precautions to protect your digital assets.
Q&A:
What is Trezor Algorand?
Trezor Algorand is a hardware wallet that supports the Algorand blockchain. It provides a secure and convenient way to store and manage Algorand assets.
How can I set up Trezor Algorand?
To set up Trezor Algorand, you need to connect your Trezor device to your computer, install the Trezor Bridge software, and follow the instructions on the Trezor website. The setup process involves creating a new wallet, setting a PIN code, and writing down a recovery seed phrase.
Can I use Trezor Algorand with other cryptocurrencies?
Yes, Trezor Algorand supports multiple cryptocurrencies, including Bitcoin, Ethereum, and many more. You can manage all your supported cryptocurrencies using the Trezor wallet interface.
How secure is Trezor Algorand?
Trezor Algorand is considered highly secure because it stores your private keys offline in a hardware device, making it resistant to hacking and malware attacks. Additionally, the device includes several security features such as PIN code protection and passphrase support.
How can I use Trezor Algorand to send and receive Algorand assets?
To send and receive Algorand assets using Trezor Algorand, you need to connect your device to your computer, open the Trezor wallet interface, and select the Algorand wallet. From there, you can generate a receive address to receive assets or initiate a transaction to send assets to another address.


