
The process of transferring USDT to any wallet
Welcome to our comprehensive guide on how to effortlessly transfer USDT (Tether) to any wallet. Whether you’re a seasoned crypto enthusiast or just getting started, we’ve got you covered.
Step 1: Choose Your Wallet
Before you can transfer your USDT, you need to have a secure wallet to store it. There are numerous options available, such as hardware wallets, software wallets, and mobile wallets. Make sure to do thorough research and choose a wallet that fits your needs.
Step 2: Obtain your USDT Address
Once you have selected your wallet, you will need to obtain your USDT address. This unique address is where you will send your USDT to. Simply open your wallet and look for the option to create a new USDT address.
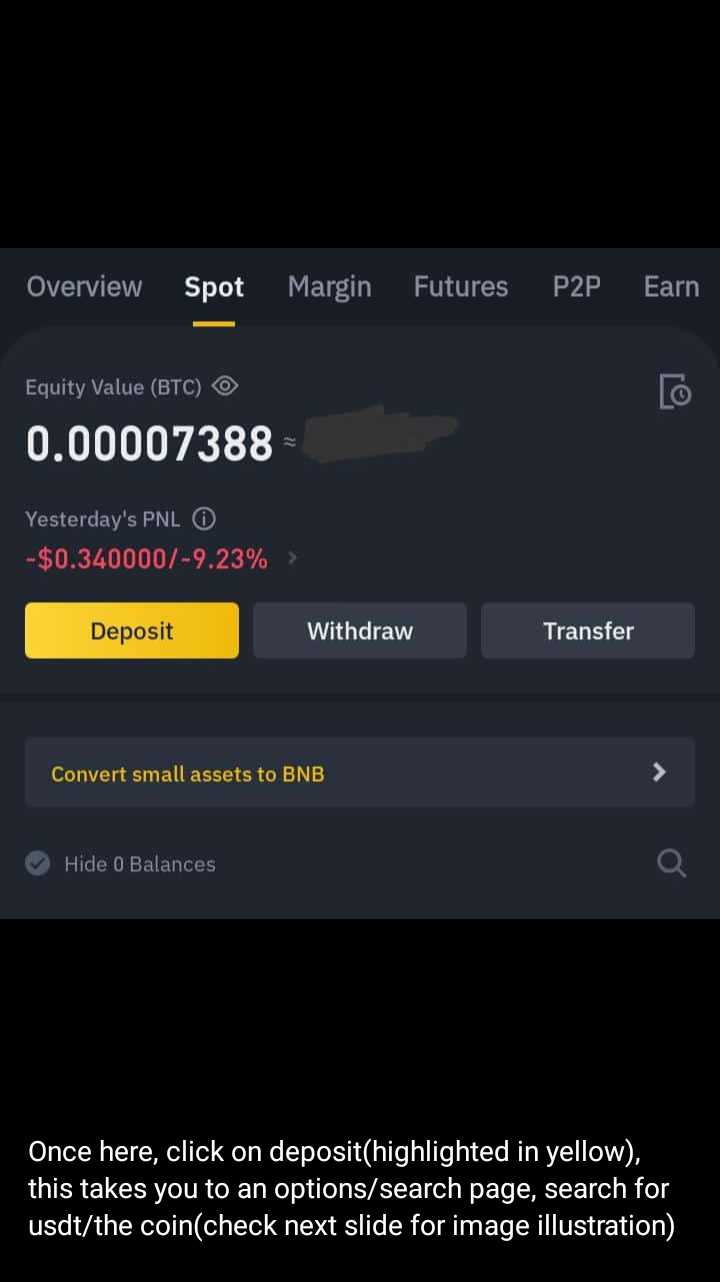
Step 3: Initiate the Transfer
Now that you have your wallet and USDT address ready, it’s time to initiate the transfer. Open your current wallet or exchange account and locate the option to transfer/withdraw your USDT. Enter your USDT address as the recipient and specify the amount you want to transfer.
Step 4: Confirm and Wait for Confirmation
Double-check all the details of your transfer and proceed to confirm the transaction. Depending on network congestion, it may take some time for the transfer to be processed and confirmed. Be patient and keep an eye on your wallet for incoming transactions.
Step 5: Enjoy Your Transferred USDT
Congratulations! Once the transfer is confirmed, you can now enjoy your newly transferred USDT in your chosen wallet. You can hold it as an investment, use it for online purchases, or explore various other opportunities offered by USDT.
So, whether you’re looking to diversify your crypto portfolio or simply want to try out USDT, our ultimate guide will help you navigate the process seamlessly. Follow these steps, and soon you’ll be confidently transferring USDT to any wallet with ease.
Disclaimer: Always exercise caution and follow the recommended security practices to ensure the safety of your USDT and other digital assets.
Benefits of Transferring USDT
Transferring USDT (Tether) to any wallet offers a range of benefits that make it an attractive option for users:
1. Instant and Borderless
USDT transfers are processed instantly, allowing users to send and receive funds quickly. Whether you are transferring USDT within the same country or across borders, the transaction is seamless and efficient, eliminating the need for intermediaries and reducing transaction fees.
2. Secure and Private
USDT transfers are secured by blockchain technology, offering a high level of security and privacy. Each transaction is recorded on the blockchain, ensuring transparency and eliminating the risk of fraud or unauthorized access. Additionally, the use of encryption techniques provides anonymity, protecting the privacy of the users.
3. Lower Transaction Costs
Transferring USDT involves lower transaction costs compared to traditional banking systems or other transfer methods. With minimal fees, users can transfer large amounts of funds without incurring significant expenses. This cost-effectiveness makes USDT transfers an ideal option for individuals and businesses alike.
4. Diverse Usage
USDT can be easily utilized in various ways, providing users with flexibility and convenience. It can be used to make online purchases, send money to friends and family, invest in cryptocurrencies, trade on exchanges, and more. The diverse usage options make USDT a versatile digital asset.
5. Stable Value
USDT is a stablecoin, meaning its value is pegged to a specific currency, typically the US dollar. This stability reduces the risk of price fluctuations commonly found in other cryptocurrencies. Transferring USDT allows users to maintain the value of their assets, ensuring predictability and stability in their transactions.
Overall, transferring USDT provides a reliable, convenient, and cost-effective method for moving funds across wallets, offering users a range of benefits that enhance their financial transactions and experiences.
Common Challenges in USDT Transfers
Transferring USDT (Tether) to any wallet can be a convenient way to manage and secure your digital assets. However, there are certain challenges that users may encounter during the process. Being aware of these challenges beforehand can help you make a successful transfer without any complications.
1. Incorrect Wallet Address
One of the most common challenges in USDT transfers is entering an incorrect wallet address. Carelessly inputting the wrong address can result in the permanent loss of your USDT. Always double-check the address before confirming the transfer, and consider using copy-paste to avoid manual errors.
2. Network Congestion
Due to high demand and network congestion, USDT transfers may experience delays. This can be frustrating, especially if you need to make time-sensitive transactions. It’s essential to plan ahead and be patient during peak transaction periods.
3. Transaction Fees
USDT transfers usually involve transaction fees, which vary depending on the wallet and the network you are using. These fees can add up over time, impacting the overall cost-effectiveness of your transfers. Be sure to research and choose a wallet and network that offer reasonable fees.
4. Lack of Customer Support

In some cases, users may encounter difficulties during USDT transfers that require assistance from customer support. Unfortunately, not all wallets or platforms provide reliable customer support, which can delay the resolution of any issues you may face. Prioritize choosing a wallet or platform with responsive and helpful customer support.
5. Security Risks
The security of your USDT can be at risk during transfers if you do not take necessary precautions. Always verify the security measures and reputation of the wallet or platform you are using. Additionally, enable two-factor authentication and regularly update your passwords to minimize the chances of unauthorized access to your USDT.
By being aware of these common challenges, you can take the necessary steps to mitigate risks and ensure successful USDT transfers. Remember to stay informed, exercise caution, and choose reputable wallets or platforms for your digital asset management.
Step-by-Step Guide
Transferring USDT to any wallet is easy with the following step-by-step guide:
| Step 1: | Create or choose a USDT wallet |
| Step 2: | Ensure the wallet supports USDT |
| Step 3: | Log in to your USDT wallet |
| Step 4: | Click on the “Send” or “Transfer” button |
| Step 5: | Enter the recipient’s wallet address |
| Step 6: | Specify the amount of USDT to transfer |
| Step 7: | Double-check the information entered |
| Step 8: | Click on the “Confirm” or “Send” button |
| Step 9: | Wait for the transfer to be completed |
| Step 10: | Verify the transfer in the recipient’s wallet |
By following these simple steps, you can easily transfer your USDT to any wallet of your choice. Ensure that you have entered the correct wallet address and amount before confirming the transfer. It’s always a good practice to double-check the details to prevent any errors or loss of funds. Start transferring your USDT with confidence today!
Creating a USDT Wallet
To start transferring USDT to any wallet, you first need to create a USDT wallet. Follow these steps to create your USDT wallet:
- Choose a reliable wallet provider: There are several reputable wallet providers that support USDT, such as Trust Wallet, MyEtherWallet, and Ledger. Research and choose the wallet provider that best suits your needs.
- Download and install the wallet app: Once you have chosen a wallet provider, visit their website or app store to download the wallet application. Make sure to download the official app to avoid any security risks.
- Create a new wallet: Open the wallet app and follow the instructions to create a new wallet. This typically involves setting a strong password and securely storing your recovery phrase. Be sure to write down and protect your recovery phrase as it will be your only way to restore access to your wallet if you forget your password.
- Verify and secure your wallet: After creating your wallet, it is essential to verify and secure it. Enable two-factor authentication if available and make sure to regularly update your wallet app to benefit from the latest security patches and features.
- Access your wallet address: Once your wallet is set up and secured, you will be provided with a unique wallet address. This address is what you will use to receive and send USDT.
By following these simple steps, you can create a USDT wallet and start transferring your USDT to any wallet of your choice. Remember to always stay vigilant and keep your wallet and recovery phrase secure to protect your funds.
Linking Bank Account to USDT Wallet
One of the key benefits of using USDT is its ease of use when it comes to transferring funds to various wallets. By linking your bank account to your USDT wallet, you can seamlessly manage your funds and have the freedom to transfer them as needed.
Linking your bank account to your USDT wallet is a straightforward process that can be completed in just a few simple steps. Here’s how:
Step 1: Open your USDT Wallet
If you don’t already have a USDT wallet, create one by downloading a trusted wallet application from the official USDT website or any reputable app store.
Step 2: Go to the Account Settings
Once you have access to your USDT wallet, navigate to the account settings section. This can typically be found by clicking on your profile icon or a similar option within the wallet app.
Step 3: Select “Link Bank Account”
In the account settings section, look for an option that allows you to link your bank account. This option may vary depending on the wallet app you are using. Once you find it, click on it to proceed.
Step 4: Provide Your Bank Account Details
Next, you will need to provide your bank account details, including the account holder’s name, account number, and routing number. Make sure to double-check the accuracy of the information you enter to avoid any issues.
Step 5: Verify Your Bank Account
After entering your bank account details, you may be required to verify your account. This verification process may involve confirming small deposits made by the USDT wallet into your bank account or providing additional identity verification documents.
Once your bank account is successfully linked to your USDT wallet, you will have the ability to transfer funds directly between the two. This opens up a world of possibilities, allowing you to easily exchange USDT for other currencies or make payments directly from your USDT balance.
Note: It’s important to ensure that you are using a reputable and secure USDT wallet application to protect your funds and personal information.
Q&A:
Can I transfer USDT to any wallet outside the United States?
Yes, you can transfer USDT to any wallet, regardless of its location. USDT is a digital currency that can be transferred to any wallet that supports this cryptocurrency. The recipient’s wallet address is the only information you need in order to make the transfer.
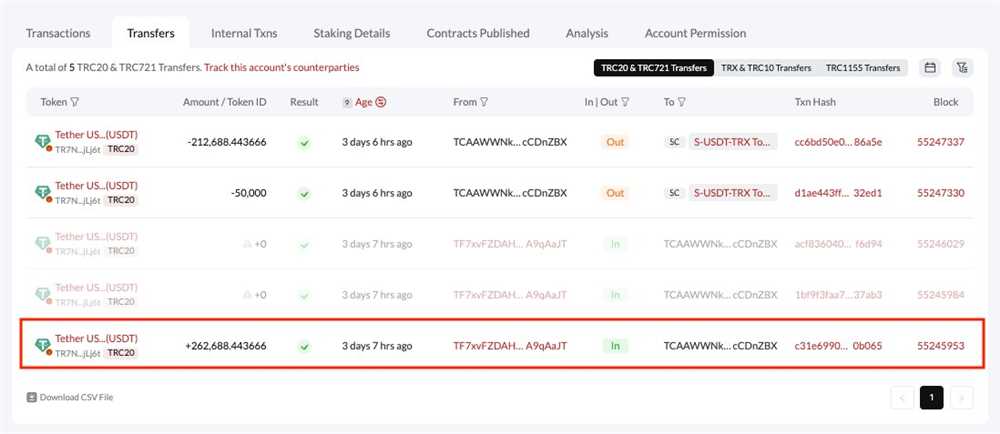
Are there any fees associated with transferring USDT to any wallet?
Yes, there are usually fees associated with transferring USDT to any wallet. The fees may vary depending on the platform or exchange you are using. It is advisable to check the fee schedule of the platform or exchange before making a transfer to ensure you are aware of any fees involved.
How long does it take to transfer USDT to any wallet?
The time it takes to transfer USDT to any wallet can vary depending on several factors. These factors include the current network congestion, the fee you are willing to pay for transaction priority, and the confirmation requirements set by the recipient’s wallet. Generally, USDT transfers are relatively fast, and the funds should be available in the recipient’s wallet within a few minutes to an hour.


