Trezor Wallet Software Tutorial for Beginners
Welcome to the Trezor Wallet Software Tutorial! In this comprehensive guide, we will walk you through the process of setting up and using your Trezor hardware wallet. Whether you are new to cryptocurrencies or a seasoned investor, using a hardware wallet like Trezor is essential for securing your digital assets.
Trezor is a trusted and widely used hardware wallet that offers a secure way to store your cryptocurrencies. Unlike online wallets or exchanges, Trezor keeps your private keys offline, protecting your funds from hackers and online threats. With its user-friendly interface and advanced security features, Trezor Wallet Software provides a seamless experience for both beginners and experienced users.
In this tutorial, we will cover everything you need to know to get started with your Trezor hardware wallet. We will guide you through the initial setup, explain how to send and receive cryptocurrencies, and highlight the additional features and benefits of using Trezor Wallet Software. By the end of this guide, you will have a clear understanding of how to safely store your digital assets and take full control of your crypto investments.
Trezor Wallet Software Tutorial
Welcome to the Trezor Wallet Software Tutorial! Here, we will guide you through the process of setting up and using the Trezor Wallet software for the first time. Whether you are a beginner or just new to this hardware wallet, this step-by-step guide will help you navigate through all the necessary steps to get started with your Trezor device.
Step 1: Download the Trezor Wallet Software
The first step is to download the Trezor Wallet software onto your computer. You can find the official Trezor website and download the software from there. Make sure you choose the correct version for your operating system (Windows, macOS, or Linux).
Step 2: Install and Set Up the Software
Once the software is downloaded, locate the installation file and run it. Follow the installation wizard’s instructions to complete the installation process. Once installed, launch the Trezor Wallet software and connect your Trezor device to the computer using the USB cable.
If your Trezor device is not recognized, make sure you have the latest firmware installed. You can check for firmware updates directly in the Trezor Wallet software.
Step 3: Create a New Wallet

With the Trezor Wallet software installed and your device connected, you can now create a new wallet. Click on the “Create new” button and follow the on-screen instructions to set up a new wallet on your Trezor device.
During the setup process, you will be prompted to enter a strong and memorable passphrase. Make sure to choose a passphrase that is hard to guess but easy for you to remember. This passphrase will serve as an additional security measure for accessing your funds.
Step 4: Make Your First Transaction

Now that your wallet is set up, you can start making transactions. To receive funds, simply provide the sender with your wallet address. To send funds, click on the “Send” button and enter the recipient’s wallet address and the amount you wish to send.
Review the transaction details carefully before confirming the transaction. Once confirmed, the transaction will be signed with your Trezor device and broadcasted to the network for processing.
Remember to always double-check the recipient’s address to avoid sending funds to the wrong destination.
That’s it! You have successfully completed the Trezor Wallet Software Tutorial. Now you can explore the various features of the Trezor Wallet software and securely manage your cryptocurrencies using your Trezor hardware wallet.
Step-by-Step Guide for Beginners
Are you new to Trezor wallet software? Don’t worry, we’ve got you covered with this step-by-step guide that will walk you through the process of setting up and using your Trezor wallet.
Step 1: Connect your Trezor device to your computer using the USB cable.
Step 2: Open the Trezor wallet software on your computer.
Step 3: Create a new wallet by clicking on the “Create New Wallet” button.
Step 4: Follow the on-screen instructions to choose a strong, unique password for your wallet. Remember to write down your password and keep it in a safe place.
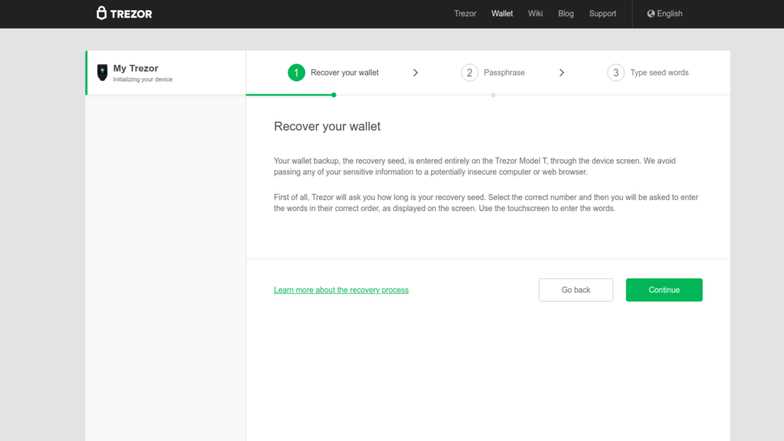
Step 5: After creating your wallet, you will be prompted to write down your recovery seed. This recovery seed can be used to restore your wallet if you ever lose access to your Trezor device.
Step 6: Carefully write down your recovery seed and store it in a secure location. It is important to keep this seed phrase private and not share it with anyone.
Step 7: Once you have written down your recovery seed, you will be asked to confirm it by selecting words in the correct order. This is a security measure to ensure that you have properly written down your recovery seed.
Step 8: After confirming your recovery seed, your Trezor wallet is now set up and ready to use. You can now send and receive cryptocurrency, view your transaction history, and manage your wallet settings.
Remember to always keep your Trezor device and recovery seed safe and secure. These are the keys to accessing your wallet and should be treated with the utmost care.
Now that you have completed this step-by-step guide, you are well on your way to using your Trezor wallet with confidence and peace of mind. Happy crypto investing!
Q&A:
What is Trezor Wallet?
Trezor Wallet is a hardware wallet that provides secure storage for cryptocurrencies. It is designed to keep your private keys offline and protect them from hackers and other potential threats.
How do I set up a Trezor Wallet?
To set up a Trezor Wallet, you need to first connect your Trezor device to your computer or mobile device. Then, you will need to follow the prompts on the screen to configure your device and create a new wallet. Once the setup is complete, you will be able to access your wallet and manage your cryptocurrencies securely.
What cryptocurrencies can be stored in Trezor Wallet?
Trezor Wallet supports a wide range of cryptocurrencies, including Bitcoin, Ethereum, Litecoin, and many others. You can check the official Trezor website for a full list of supported cryptocurrencies.
Is Trezor Wallet safe to use?
Yes, Trezor Wallet is considered to be one of the safest options for storing cryptocurrencies. The wallet utilizes strong encryption and keeps your private keys offline, making it extremely difficult for hackers to gain unauthorized access to your funds. However, it’s important to remember to follow best practices for security, such as keeping your device and recovery seed in a safe place.