
Transfer Crypto between Your Trezor and iPhone with Ease
If you are a cryptocurrency enthusiast who uses both Trezor and iPhone for managing your digital assets, you might be wondering how to transfer crypto between these two devices. Fortunately, the process is quite simple and straightforward. In this step-by-step guide, we will walk you through the process of transferring cryptocurrency between your Trezor hardware wallet and your iPhone, ensuring the security of your funds along the way.
Step 1: Connect your Trezor to your iPhone. To begin the transfer process, you need to connect your Trezor hardware wallet to your iPhone. Make sure you have the latest version of the Trezor app installed on your device. Connect your Trezor to your iPhone using the USB cable that came with the device. Once connected, open the Trezor app on your iPhone.
Step 2: Unlock your Trezor. On the Trezor app, you will be prompted to enter your PIN to unlock your device. Enter the correct PIN using the on-screen keypad. If you have enabled the passphrase feature on your Trezor, you will also need to enter your passphrase to unlock your device.
Step 3: Select the cryptocurrency you want to transfer. After unlocking your Trezor, you will see a list of cryptocurrencies supported by the Trezor app. Select the cryptocurrency that you want to transfer from your Trezor to your iPhone. Make sure you have enough funds in the selected cryptocurrency to complete the transfer.
Step 4: Initiate the transfer. Once you have selected the cryptocurrency, click on the “Send” button to initiate the transfer. On the next screen, enter the recipient’s address, which can be the address of your iPhone wallet or any other compatible wallet. Double-check the address to ensure its accuracy, as cryptocurrency transfers are irreversible.
Step 5: Confirm the transfer on your Trezor. After entering the recipient’s address, your Trezor will display the transaction details, including the amount and the fee. Verify the details on your Trezor’s screen and confirm the transfer by pressing the physical button on your Trezor. This step ensures that the transfer is authorized by the owner of the Trezor wallet, adding an extra layer of security to the process.
Step 6: Wait for the transfer to complete. Once you have confirmed the transfer on your Trezor, you will need to wait for the transfer to be processed and confirmed on the blockchain. The time it takes for the transfer to complete depends on the congestion of the cryptocurrency network and the transaction fee you have chosen. You can track the status of the transfer on the Trezor app or by using a blockchain explorer.
By following these simple steps, you can easily transfer cryptocurrency between your Trezor hardware wallet and your iPhone. Remember to always double-check the recipient’s address and transaction details to ensure the security of your funds. Happy transferring!
How to Transfer Crypto between Trezor and iPhone: Step-by-Step Guide
If you own a Trezor hardware wallet and would like to transfer your cryptocurrency to an iPhone, you’re in luck! Follow these simple steps to seamlessly transfer your crypto between your Trezor device and your iPhone:
- Ensure that you have the Trezor Wallet app downloaded on your iPhone. You can find it in the App Store.
- Connect your Trezor device to your iPhone using a compatible OTG cable or a Lightning to USB adapter. Make sure your Trezor is powered on.
- Once your Trezor is connected, open the Trezor Wallet app on your iPhone.
- Select the cryptocurrency that you want to transfer from your Trezor to your iPhone from the list of available options in the app. This list will include popular cryptocurrencies like Bitcoin and Ethereum, as well as many others.
- On your Trezor device, navigate to the “Send” or “Transfer” section for the selected cryptocurrency.
- Enter the recipient’s address on your Trezor device. This address is usually a long string of alphanumeric characters and is unique to each cryptocurrency.
- Confirm the transaction details on your Trezor device. Verify that the recipient’s address and the amount you want to transfer are correct.
- Once you have confirmed the transaction details, authorize the transaction on your Trezor device by pressing the corresponding button.
- Wait for the transaction to be processed. The time it takes for the transaction to complete can vary depending on the network congestion and the specific cryptocurrency you are transferring.
- Once the transaction is confirmed, you will see the transferred cryptocurrency reflected in your Trezor Wallet app on your iPhone. You can now securely manage and use your crypto on your iPhone.
Congratulations! You have successfully transferred your cryptocurrency between your Trezor hardware wallet and your iPhone. Remember to always double-check the recipient’s address and transaction details before confirming any transfer.
Step 1: Set up Trezor Wallet on iPhone
Before you can start transferring crypto between your Trezor and iPhone, you need to set up the Trezor Wallet on your iPhone. Follow these steps to do that:
Step 1.1: Download and Install the Trezor Wallet App
In order to use your Trezor on your iPhone, you’ll need to download and install the Trezor Wallet app from the App Store. Open the App Store on your iPhone and search for “Trezor Wallet.” Once you’ve found the app, tap on “Get” to download and install it on your device.
Step 1.2: Connect Your Trezor Device to Your iPhone
Now that you have the Trezor Wallet app installed on your iPhone, it’s time to connect your Trezor device. Take your Trezor device and the USB cable that came with it. Plug one end of the cable into your Trezor device and the other end into your iPhone using a Lightning to USB adapter.
Note: Depending on the iPhone model you have, you may need to use a different type of adapter. Make sure you have the correct adapter for your iPhone.
Step 1.3: Set Up Your Trezor Wallet
Open the Trezor Wallet app on your iPhone. Follow the on-screen instructions to set up your wallet. You’ll need to choose a PIN code for your Trezor device and create a recovery seed. Make sure to write down and keep your recovery seed in a safe place, as it will be essential for recovering your wallet in case your Trezor device is lost or damaged.
Important: Do not share your PIN code or recovery seed with anyone. Keep them confidential.
Once you’ve set up your Trezor Wallet, you’ll be ready to start transferring crypto between your Trezor device and your iPhone.
Step 2: Connect Trezor to iPhone
To transfer your Crypto between your Trezor wallet and your iPhone, you’ll need to connect your Trezor device to your iPhone. Follow these steps to establish a connection:
Step 1: Install the Trezor Bridge
Before connecting your Trezor to your iPhone, you’ll need to install the Trezor Bridge on your computer. The Bridge allows your Trezor to communicate with your iPhone and enables data transfer securely. Visit the Trezor website and download the Trezor Bridge for your operating system.
Step 2: Connect your Trezor Device
Once you have installed the Trezor Bridge, connect your Trezor device to your iPhone using the USB cable that came with it. Plug the cable into your Trezor device and the other end into your iPhone’s lightning port.
Note: Depending on the model of your iPhone, you may need to use an adapter to connect the USB cable to the lightning port.
Step 3: Open the Trezor App
On your iPhone, open the Trezor app. If you haven’t already installed it, you can download it from the App Store. Once the app is open, it will automatically detect your Trezor device and establish a connection.
Step 4: Verify Connection
Once the connection is established, you will see a notification on your Trezor device asking you to confirm the connection. Verify the connection on your device by confirming the prompt.
Once you have successfully connected your Trezor device to your iPhone, you are ready to transfer your Crypto between the two. Follow the next steps in the guide to complete your transfer.
Step 3: Transfer Crypto Funds
Now that you have your Trezor hardware wallet set up and your iPhone ready, it’s time to transfer your cryptocurrency funds. Follow the steps below to securely transfer your crypto:
1. Connect your Trezor to your iPhone
Connect your Trezor hardware wallet to your iPhone using the USB cable that came with your device. Make sure your Trezor is powered on and unlocked.
2. Open the Trezor Wallet App on your iPhone
Launch the Trezor Wallet app on your iPhone. If you haven’t installed it yet, download it from the App Store and log in to your account.
3. Select the cryptocurrency you want to transfer
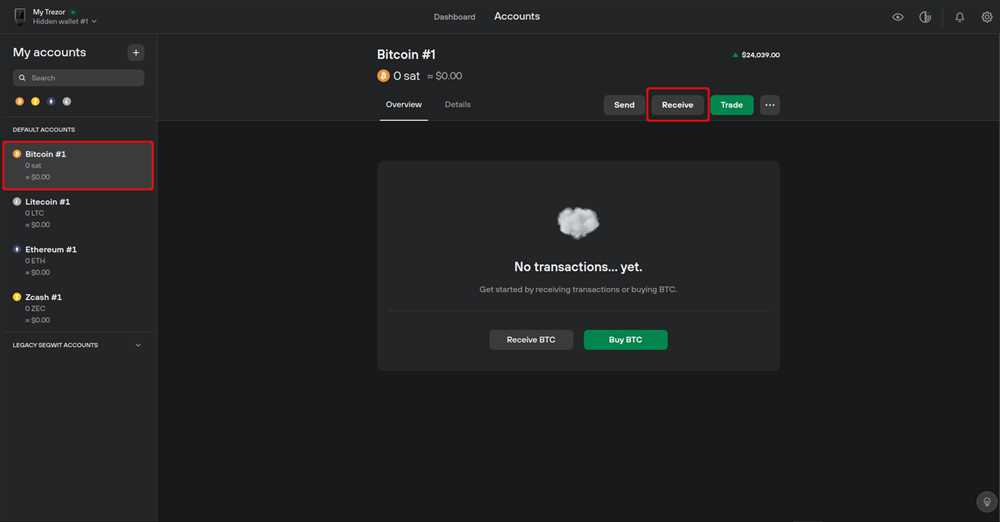
Once you’re logged in to the Trezor Wallet app, select the cryptocurrency you wish to transfer from the list of available options.
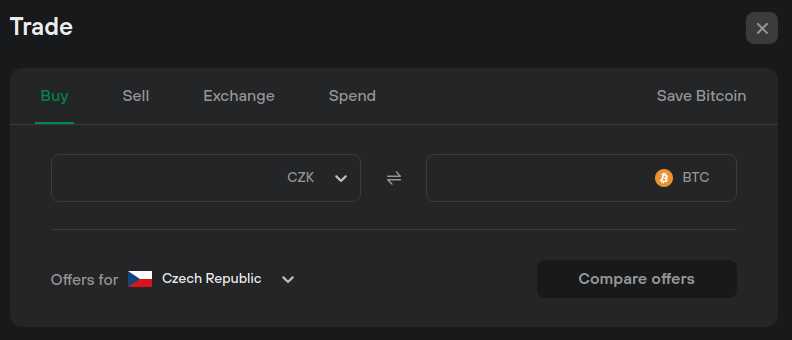
4. Click on the “Send” button
In the wallet interface, locate and click on the “Send” button to begin the transfer process.
5. Enter the recipient’s address
Provide the recipient’s wallet address in the designated field. Make sure to double-check the address to avoid any errors or loss of funds.
Note: If you’re transferring funds to another Trezor device, you may be able to use the “Confirm on Trezor” feature for added security.
 6. Enter the amount you want to transfer
Specify the amount of cryptocurrency you want to transfer. You can enter the amount in either the cryptocurrency or the equivalent fiat currency.
7. Review and confirm the transaction details
Check all the details of the transaction, including the amount, recipient address, and transaction fee. Once you’re satisfied, click on the “Confirm” button to initiate the transfer.
Congratulations! You have successfully transferred your crypto funds from your Trezor hardware wallet to your iPhone using the Trezor Wallet app. Make sure to keep your Trezor device secure and regularly update your wallet app for improved security.
Q&A:
Can I transfer my cryptocurrencies from my Trezor device to my iPhone?
Yes, you can transfer your cryptocurrencies from your Trezor device to your iPhone. There are several ways to do it, and this article provides a step-by-step guide on how to transfer crypto between Trezor and iPhone.
What is Trezor and how does it work?
Trezor is a hardware wallet that allows you to securely store and manage your cryptocurrencies. It works by generating and storing private keys offline, away from potential online threats. To transfer crypto between Trezor and iPhone, you need to connect your Trezor device to your iPhone using a USB cable.
Do I need any additional software or apps to transfer crypto between Trezor and iPhone?
Yes, you need to install the Trezor app on your iPhone in order to transfer crypto between Trezor and iPhone. The app can be downloaded from the App Store. You also need to have the Trezor Bridge installed on your computer to establish a connection between your Trezor device and iPhone.
Are there any fees associated with transferring crypto between Trezor and iPhone?
Yes, there may be fees associated with transferring crypto between Trezor and iPhone. These fees are dependent on the cryptocurrency network you are using and may vary. It is important to check the current fees before making a transfer.
Is it safe to transfer crypto between Trezor and iPhone?
Yes, transferring crypto between Trezor and iPhone is generally considered safe. Trezor devices are designed to provide a high level of security for storing and managing cryptocurrencies. However, it is important to follow the recommended security practices, such as verifying the integrity of the device and ensuring that the software you are using is up-to-date.


