
Is it easy to sell Bitcoin on Trezor?
Selling Bitcoin can be a daunting process, especially if you’re new to cryptocurrency. But with the help of Trezor, one of the most trusted and secure hardware wallets available, the process becomes simple and straightforward. In this step-by-step guide, we’ll walk you through the process of selling your Bitcoin on Trezor, ensuring that your transaction is safe and secure.
Step 1: Connect Your Trezor Wallet
First, you’ll need to connect your Trezor hardware wallet to your computer or mobile device. Simply plug the device into your device’s USB port and follow the on-screen instructions to set it up.
Step 2: Access the Trezor Wallet Interface
Once your Trezor is connected, you’ll need to access the Trezor Wallet interface. This can be done by navigating to the Trezor website and selecting the “Wallet” option.
Step 3: Select the Bitcoin Wallet
Within the Trezor Wallet interface, you’ll see a list of available cryptocurrencies. Select the Bitcoin wallet from the list.
Step 4: Click on the “Send Bitcoin” Option
Next, locate and click on the “Send” option within the Bitcoin wallet interface. This will allow you to initiate a transaction to sell your Bitcoin.
Step 5: Enter the Recipient’s Address
In the provided field, enter the recipient’s Bitcoin address to which you wish to send your Bitcoin. Double-check the address to ensure its accuracy.
Step 6: Enter the Amount to Sell
Specify the amount of Bitcoin you wish to sell in the appropriate field. You can enter the amount in Bitcoin or your local currency, depending on your preference.
Step 7: Confirm the Transaction
Double-check all the transaction details and click on the “Confirm” button to proceed. You may also be asked to confirm the transaction on your Trezor device for added security.
Step 8: Wait for Confirmation
Once the transaction is submitted, you’ll need to wait for it to be confirmed by the Bitcoin network. This process typically takes a few minutes but can vary depending on network congestion.
Congratulations!
You’ve successfully sold your Bitcoin on Trezor! The funds will be transferred to the recipient’s address once the transaction is confirmed. Remember to keep your Trezor device and recovery seed safe, as they are essential for accessing your Bitcoin in the future.
Note: The process may vary slightly depending on the software or wallet you are using with your Trezor device. Always ensure you are using the official Trezor software and follow the instructions provided by Trezor.
Getting Started with Trezor
Welcome to Trezor! In this guide, we will walk you through the process of getting started with your Trezor hardware wallet. Trezor is a leading cryptocurrency hardware wallet that allows you to securely store, manage, and sell your Bitcoin and other cryptocurrencies.
Step 1: Unboxing your Trezor
When you receive your Trezor, make sure that the packaging is intact and has not been tampered with. Open the box and take out your Trezor device. You will find a USB cable and some instructions inside the box as well.
Step 2: Connecting your Trezor
Plug one end of the USB cable into your Trezor and the other end into a USB port on your computer. Your Trezor should power on automatically.
Step 3: Setting up your Trezor
Follow the on-screen instructions on your computer to set up your Trezor. This will include choosing a PIN code and creating a recovery seed. Make sure to write down your recovery seed and keep it in a safe place.
Step 4: Installing the Trezor Bridge
In order to use your Trezor with the Trezor Wallet software, you will need to install the Trezor Bridge. The Trezor Bridge is a special software that allows your computer to communicate with your Trezor device. Visit the official Trezor website to download and install the Trezor Bridge for your operating system.
Step 5: Accessing the Trezor Wallet software
Once you have installed the Trezor Bridge, open the Trezor Wallet software on your computer. Connect your Trezor to your computer using the USB cable and follow the on-screen instructions to access your wallet.
Step 6: Selling Bitcoin on Trezor
Now that you have set up your Trezor and accessed your wallet, you can begin selling your Bitcoin. The Trezor Wallet software provides a simple and secure interface for selling Bitcoin. Follow the on-screen instructions to sell your Bitcoin and complete the transaction.
Congratulations! You have successfully started using Trezor and sold your Bitcoin. Remember to always keep your recovery seed safe and secure to ensure the protection of your cryptocurrencies.
Disclaimer: Selling and trading cryptocurrencies involves risk. It is important to do your own research and be aware of the potential risks before making any transactions.
| Step | Description |
|---|---|
| Step 1 | Unbox your Trezor device. |
| Step 2 | Connect your Trezor to your computer with the USB cable. |
| Step 3 | Set up your Trezor by following the on-screen instructions. |
| Step 4 | Install the Trezor Bridge software on your computer. |
| Step 5 | Access the Trezor Wallet software on your computer. |
| Step 6 | Sell your Bitcoin using the Trezor Wallet software. |
Setting Up Your Trezor Device
Before you can start selling your Bitcoin on Trezor, you’ll need to set up your Trezor device. Follow these steps to get started:
- Connect your Trezor device to your computer using the USB cable provided.
- Make sure your computer is connected to the internet.
- Visit the Trezor website and download the Trezor Bridge software for your operating system. Install the software by following the on-screen instructions.
- Once the software is installed, open it and follow the prompts to initialize your Trezor device. This will involve setting a PIN code and writing down a recovery seed that will allow you to restore your wallet if needed.
- After initializing your Trezor, you’ll need to install the Trezor Wallet software on your computer. Visit the Trezor website again and download the appropriate wallet software for your operating system. Install the software and follow the on-screen instructions.
- Once the wallet software is installed, open it and select “Create new wallet” from the options.
- Follow the prompts to connect your Trezor device to the wallet software.
- On your Trezor device, confirm that you want to pair it with the wallet software.
- Once your device is paired, you’ll be able to access your Bitcoin wallet on your computer.
Now that your Trezor device is set up, you’re ready to start selling your Bitcoin. Follow the next steps in our guide to learn how.
Creating a Bitcoin Wallet on Trezor
Before you can start selling Bitcoin on Trezor, you need to have a Bitcoin wallet set up. Creating a Bitcoin wallet on Trezor is a simple and secure process that ensures the safety of your funds.
Step 1: Get a Trezor Wallet
If you don’t already have a Trezor wallet, you can easily purchase one from the official Trezor website. Trezor offers different models to choose from, so you can select the one that best suits your needs. Once you have ordered your Trezor wallet, it will be delivered to your doorstep.
Step 2: Connect Your Trezor to Your Computer

Once you have received your Trezor wallet, connect it to your computer using the provided USB cable. Make sure to use the official Trezor cable to ensure a secure connection.
After connecting your Trezor wallet to your computer, it may prompt you to install the Trezor Bridge software. Follow the on-screen instructions to complete the installation.
Step 3: Set Up Your Trezor Wallet

Now that your Trezor wallet is connected to your computer, it’s time to set it up. Open the Trezor Wallet interface on your computer and follow the simple on-screen instructions to create your new Bitcoin wallet.
During the setup process, you will be prompted to choose a PIN and write down your recovery seed. It’s important to choose a strong PIN and store your recovery seed in a safe place. These security measures will ensure that you can always recover your funds if your Trezor wallet is lost or stolen.
Step 4: Fund Your Bitcoin Wallet

Now that your Trezor wallet is set up, you can start funding it with Bitcoin. You can either purchase Bitcoin from a cryptocurrency exchange and transfer it to your Trezor wallet or receive Bitcoin from other wallets or individuals.
To receive Bitcoin, simply share your Bitcoin wallet address with the sender. They can then use that address to send Bitcoin directly to your Trezor wallet.
Once your Bitcoin wallet on Trezor is funded, you are ready to start selling Bitcoin. Follow our step-by-step guide on how to sell Bitcoin on Trezor to learn more.
Remember to always keep your Trezor wallet and recovery seed safe. With Trezor, you can securely store, manage, and sell your Bitcoin with peace of mind.
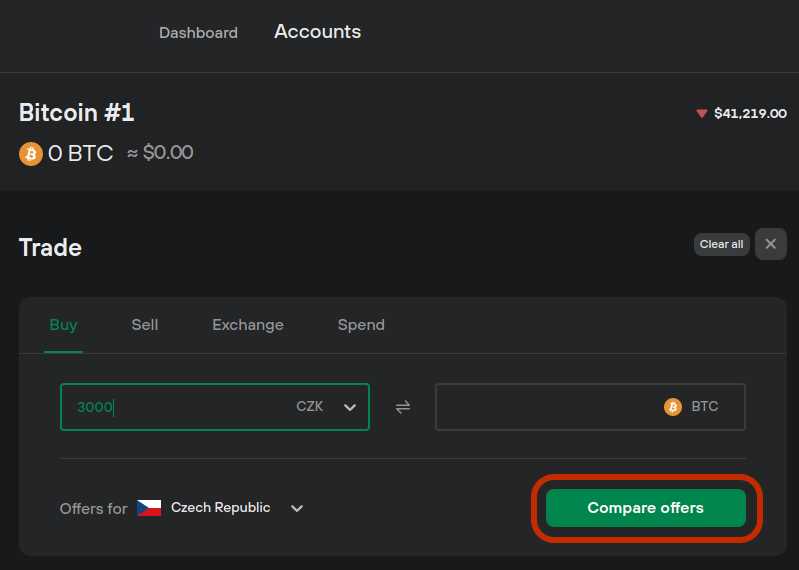
Selling Bitcoin on Trezor
Selling your Bitcoin on Trezor is a simple and secure process that allows you to convert your cryptocurrency into traditional fiat currency. Whether you want to cash out your Bitcoin holdings or you’re looking to make a profit from your investment, Trezor provides a convenient platform to sell your digital assets.
Follow these step-by-step instructions to sell Bitcoin on Trezor:
- Connect your Trezor hardware wallet to your computer using the USB cable.
- Open the Trezor Wallet interface and enter your PIN to unlock your device.
- Select the Bitcoin account from the list of supported cryptocurrencies.
- Click on the “Send” button to initiate a transaction.
- Enter the recipient’s wallet address where you want to send the Bitcoin.
- Specify the amount of Bitcoin you wish to sell.
- Review the transaction details and confirm the sale.
- Wait for the transaction to be confirmed on the Bitcoin network.
- Once the transaction is confirmed, the Bitcoin will be sent to the recipient’s wallet.
It’s important to note that selling Bitcoin on Trezor is just as secure as storing it. Your private keys remain on the device, ensuring that your funds are protected from hackers and other malicious actors. Trezor also provides a user-friendly interface that simplifies the selling process, making it accessible to both beginners and experienced cryptocurrency users.
Once you have sold your Bitcoin, you can choose to withdraw the funds to your bank account or use them to make online purchases. Trezor also supports other cryptocurrencies, giving you the flexibility to diversify your digital asset portfolio and explore different investment opportunities.
Start selling your Bitcoin on Trezor today and experience the benefits of a secure and user-friendly platform. Maximize your investment and effortlessly manage your cryptocurrency holdings with Trezor.
Accessing Your Bitcoin Wallet
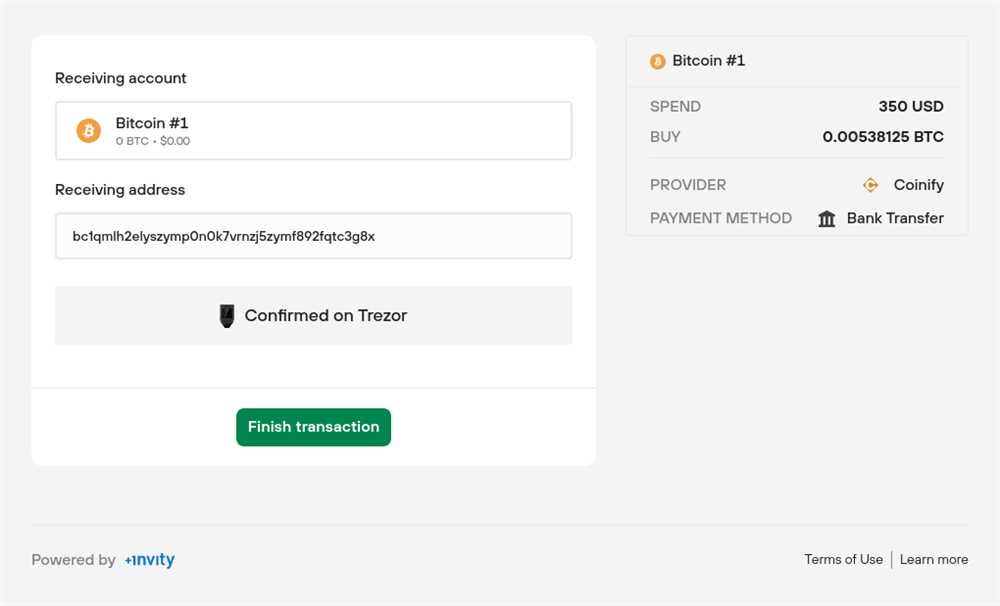
Once you have set up your Trezor hardware wallet and installed the necessary software, you can easily access your Bitcoin wallet and start selling your BTC. Here is a step-by-step guide on how to access your Bitcoin wallet:
Step 1: Connect your Trezor device to your computer using the provided USB cable.
Step 2: Open the Trezor Wallet interface on your computer.
Step 3: Enter your PIN code on the Trezor device. Make sure to keep your PIN code secure and do not share it with anyone.
Step 4: On the Trezor Wallet interface, click on the “Bitcoin” option to select your Bitcoin wallet.
Step 5: Choose the account you want to sell Bitcoin from. If you have multiple accounts, select the one that contains the Bitcoin you wish to sell.
Step 6: Click on the “Send” button to initiate a Bitcoin transaction.
Step 7: Enter the recipient’s Bitcoin address and the amount of Bitcoin you want to sell. Double-check the address to ensure its accuracy.
Step 8: Review the transaction details, including the transaction fee, before confirming the transaction.
Step 9: Confirm the transaction on your Trezor device by verifying the transaction details displayed on its screen.
Step 10: Once the transaction is confirmed, your Bitcoin will be sent to the recipient, and the amount will be deducted from your wallet balance.
Note: It is important to keep your Trezor device and recovery seed phrase safe and secure. Losing your device or recovery seed phrase can result in the permanent loss of your Bitcoin. Always double-check the recipient’s address before initiating any Bitcoin transactions.
Follow these steps carefully to ensure a smooth and secure process when accessing and selling your Bitcoin on Trezor.
Q&A:
What is the process of selling Bitcoin on Trezor?
The process of selling Bitcoin on Trezor involves a few steps. First, you need to connect your Trezor device to your computer and unlock it with your PIN. Then, open the Trezor Wallet interface and select the Bitcoin account you want to sell from. Next, click on the “Send” button and enter the recipient’s Bitcoin address. Finally, specify the amount of Bitcoin you want to sell and confirm the transaction.
Is it safe to sell Bitcoin on Trezor?
Yes, it is safe to sell Bitcoin on Trezor. Trezor is a hardware wallet that securely stores your private keys offline. When selling Bitcoin, your private keys never leave the device, providing an extra layer of security. Additionally, Trezor implements various security measures, including passphrase protection and two-factor authentication, to ensure the safety of your funds.
Can I sell Bitcoin on Trezor without connecting it to a computer?
No, you cannot sell Bitcoin on Trezor without connecting it to a computer. Trezor requires a connection to a computer or a mobile device with internet access to interact with the Bitcoin network and execute transactions. You need to connect your Trezor to a computer, open the Trezor Wallet interface, and follow the steps to sell your Bitcoin.


