Trezor Wallet: Setting Up Your Device Step-by-Step Tutorial
Welcome to the step-by-step tutorial on setting up your Trezor wallet! Are you ready to take control of your cryptocurrency securely? Look no further, as we guide you through the process of setting up your Trezor hardware wallet with ease.
With the growing popularity of cryptocurrencies, it is crucial to store your digital assets in a safe and secure manner. Trezor is a leading hardware wallet that provides top-notch security for your cryptocurrencies. Whether you are a beginner or an experienced user, this tutorial will walk you through the setup process.
Setting up your Trezor wallet is a straightforward process that can be completed in just a few steps. In this tutorial, we will cover everything you need to know, from unboxing your device to creating a recovery seed and setting up your PIN. By the end of this tutorial, you will have your Trezor wallet up and running, ready to store your valuable cryptocurrencies securely.
So let’s get started on this exciting journey of securing your digital assets with Trezor!
Trezor Wallet Setup:
Welcome to the step-by-step tutorial for setting up your Trezor wallet! In this guide, we will walk you through the process of getting your device ready for use and securing your cryptocurrencies.
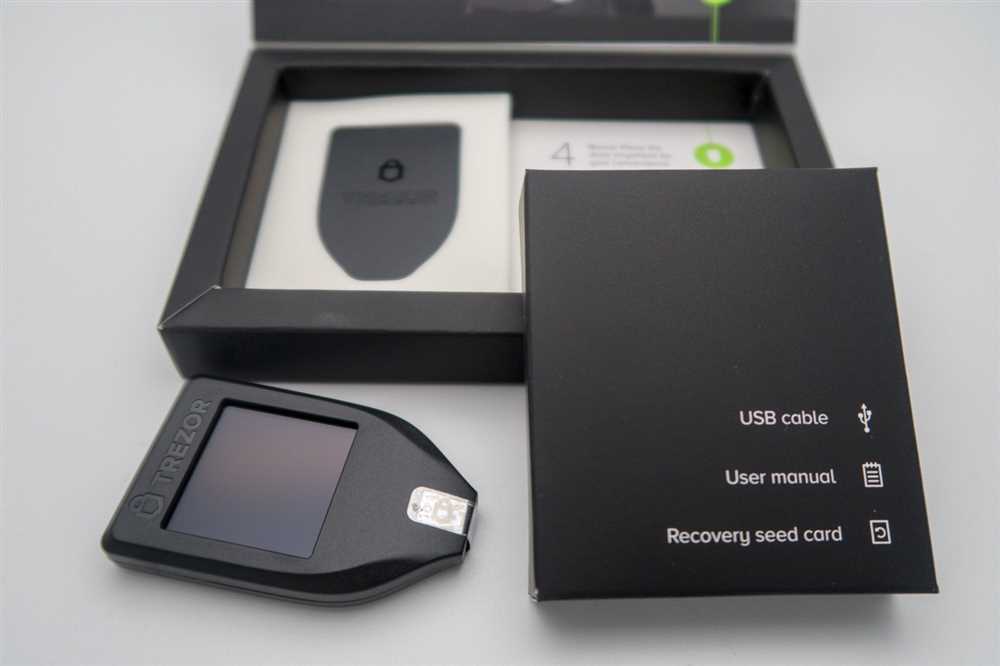
Step 1: Unboxing and Connecting
Start by unboxing your Trezor device and connecting it to your computer using the provided USB cable. Make sure your computer is connected to a stable internet connection.
Step 2: Installation
Visit the Trezor website and download the Trezor Bridge software for your operating system. Install the software following the provided instructions.
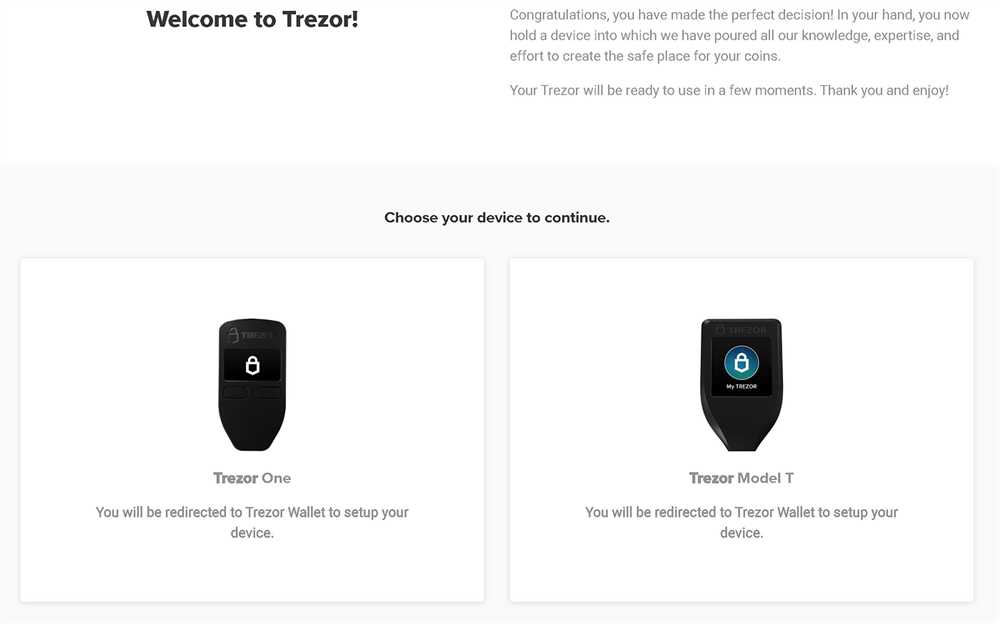
Step 3: Initializing Your Trezor Wallet
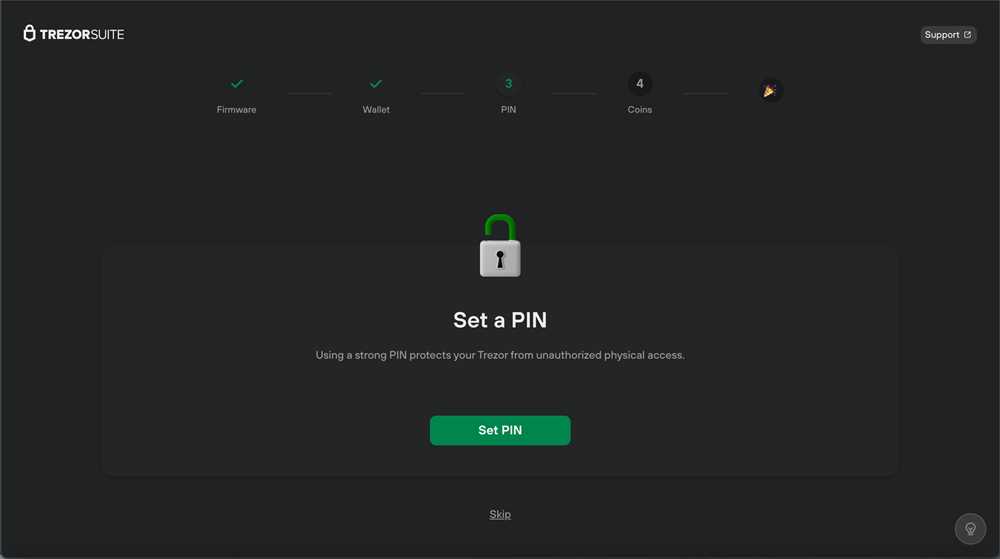
Once you have the Trezor Bridge installed, open the Trezor Wallet website and click on “Create a new wallet” to start the initialization process. Follow the on-screen instructions to set up a strong recovery seed and create a PIN for your device. Make sure to securely store your recovery seed as it is crucial for restoring your wallet.
Step 4: Firmware Update
After you have successfully initialized your Trezor wallet, it is recommended to check for any available firmware updates. Connect your Trezor device to your computer and follow the prompts to update the firmware to the latest version.
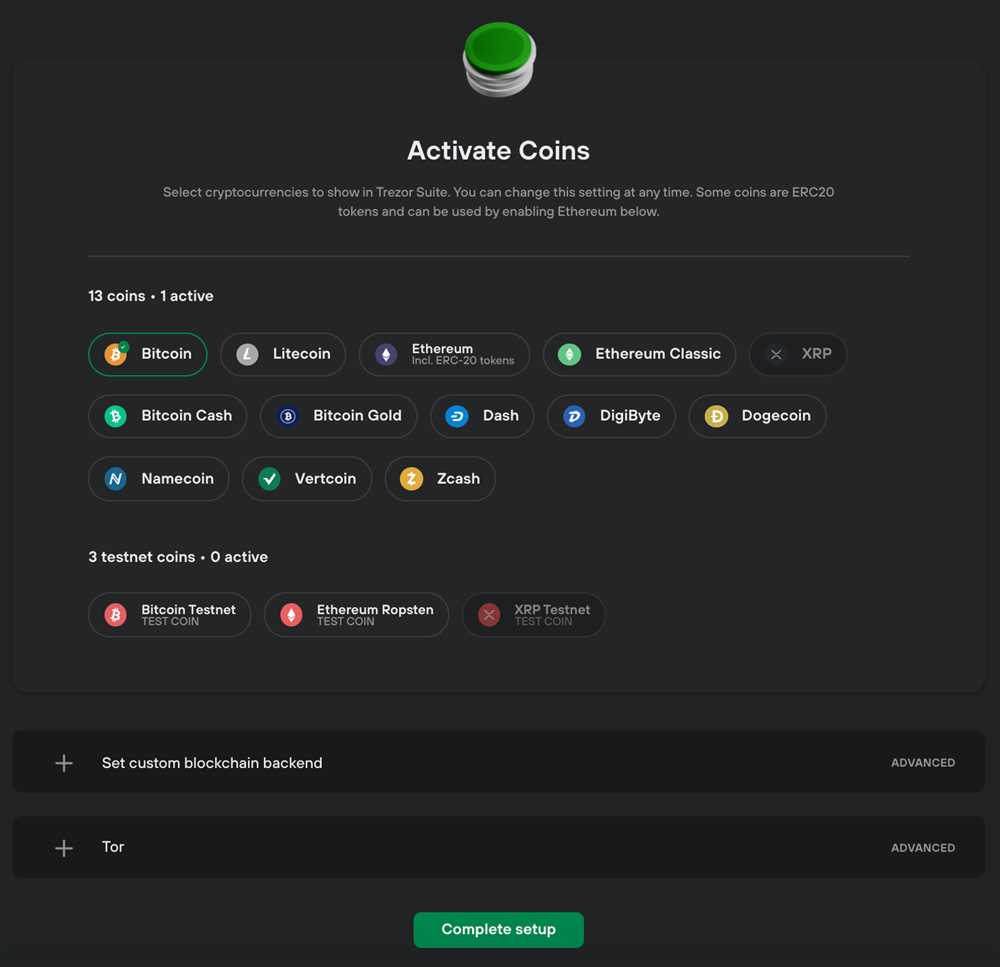
Step 5: Cryptocurrency Support
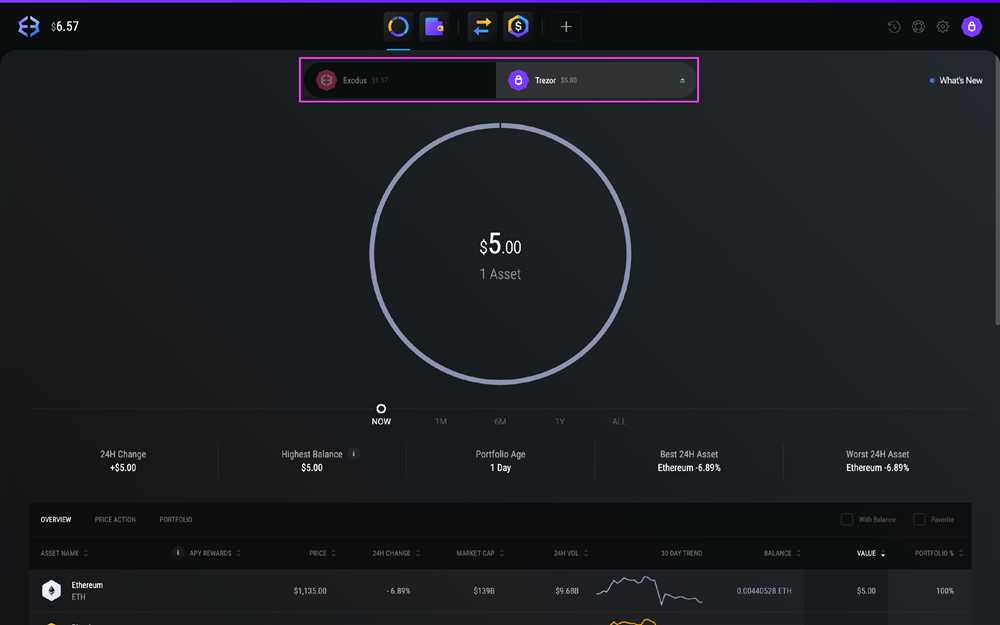
Now that your Trezor wallet is set up and up-to-date, you can choose which cryptocurrencies you want to use with your device. Visit the Trezor Wallet website and enable the desired coins in the “Coins” tab. You can also install compatible third-party wallets for specific coins.
Step 6: Security Measures
Lastly, take the time to familiarize yourself with the security features of your Trezor wallet. Enable additional security settings such as passphrase encryption or two-factor authentication for added protection. Remember to keep your device’s firmware and all connected software up to date to stay protected against any potential vulnerabilities.
| Troubleshooting Tips: |
|---|
| If you encounter any issues during the setup process, make sure to check the official Trezor documentation and support forums for assistance. You can also reach out to the Trezor support team for further guidance. |
By following these step-by-step instructions, you should now have your Trezor wallet set up and ready to securely store and manage your cryptocurrencies. Remember to always practice good security habits and keep your recovery seed and PIN in a safe place.
Step-by-Step Tutorial
Welcome to our step-by-step tutorial for setting up your Trezor wallet! Follow these instructions carefully to ensure a smooth and secure setup process.
Step 1: Unboxing your Trezor device
Start by unboxing your Trezor device and taking out all the contents.
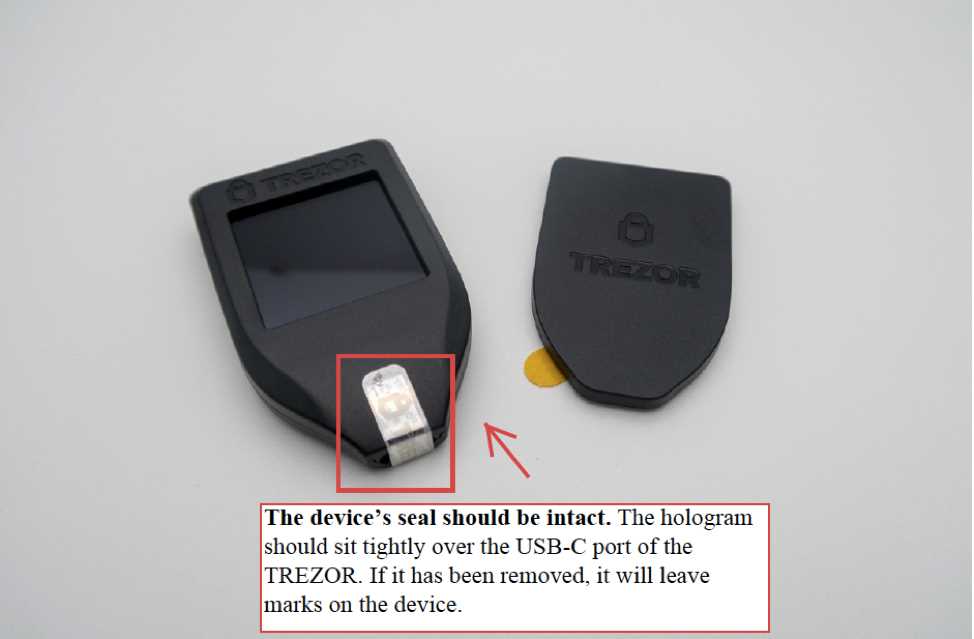
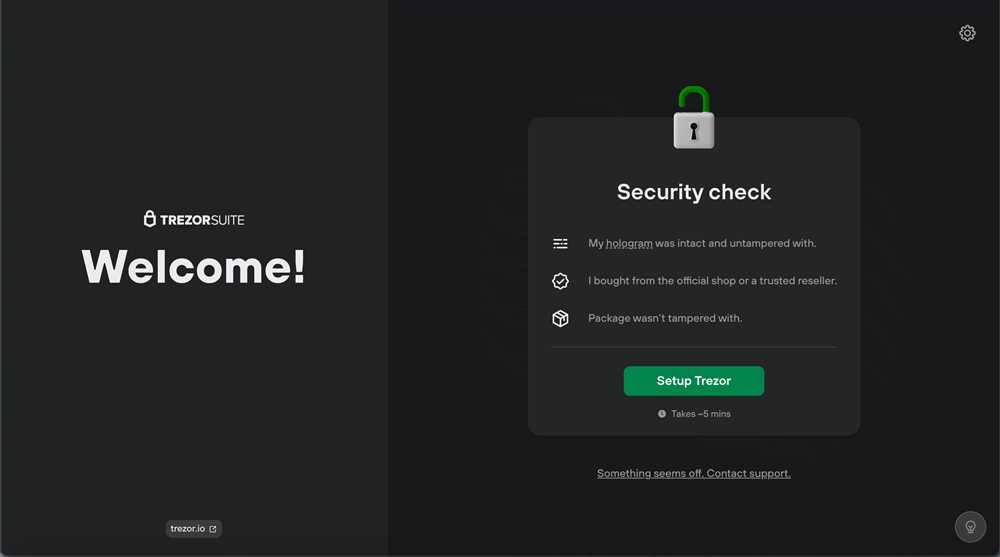
Important: Make sure the package is sealed and hasn’t been tampered with. If you notice any signs of tampering, contact the seller immediately.
Step 2: Connecting your Trezor to your computer
Connect your Trezor device to your computer using the provided USB cable.
Note: The USB cable is usually included in the package, but if it’s missing, make sure to use a high-quality USB cable to ensure a stable connection.
Step 3: Downloading and installing the Trezor Bridge
Visit the official Trezor website and download the Trezor Bridge software compatible with your operating system.
Tip: If you’re not sure which version to download, refer to the user manual or the official Trezor website for guidance.
Once downloaded, run the installer and follow the on-screen instructions to complete the installation.
Step 4: Initializing your Trezor device
Launch the Trezor Bridge software on your computer and click on the “Set up new device” option.
Follow the prompts on the screen to initialize your Trezor device.
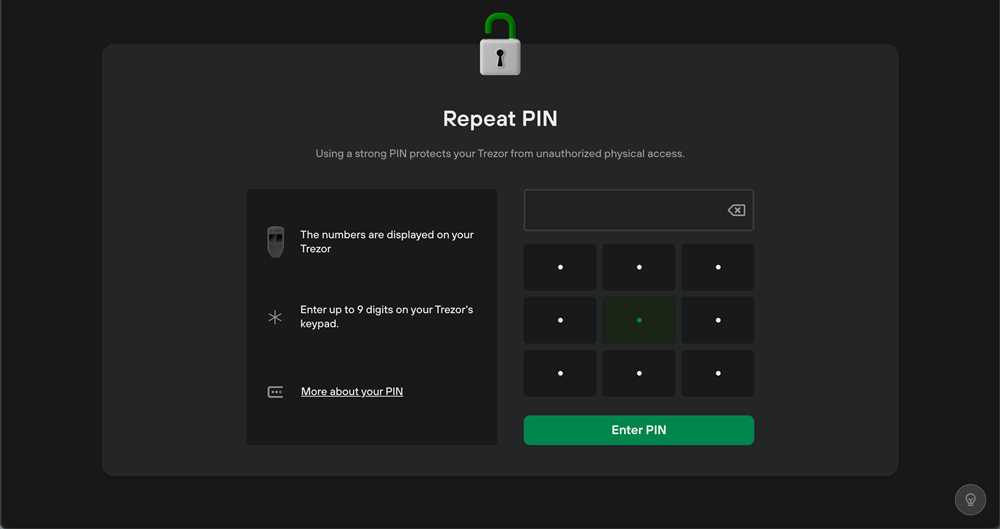
Note: Make sure to choose a strong, unique PIN code for your device and write it down in a safe place.
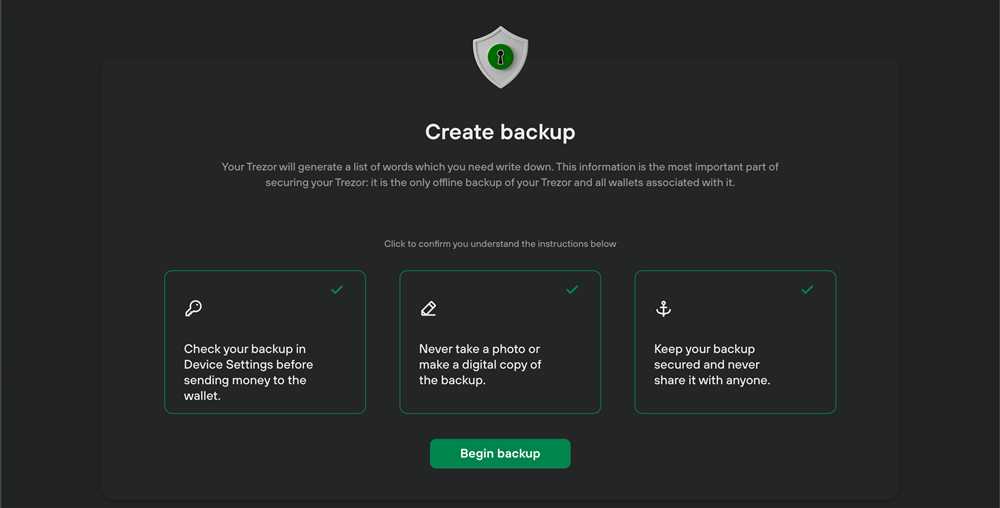
Step 5: Creating a recovery seed
During the initialization process, you will be prompted to create a recovery seed.
Important: Write down the recovery seed on the provided card and keep it in a secure location. This seed will be the only way to recover your funds in case your device is lost or damaged.
Step 6: Verifying your recovery seed
After creating the recovery seed, the device will ask you to verify it by entering the words in the correct order.
Tip: Take your time and double-check the order of the words to ensure accuracy.
Note: This step is crucial as it ensures that you have correctly noted down your recovery seed and can access your funds when needed.
Congratulations! You have successfully set up your Trezor wallet. Remember to regularly update your device’s firmware and keep your recovery seed safe. Enjoy the enhanced security and peace of mind that comes with owning a Trezor hardware wallet.
Setup Your Device
Setting up your Trezor wallet device is a straightforward process that only takes a few minutes. Follow these step-by-step instructions to get your device up and running.
Step 1: Connect Your Trezor
Start by plugging in your Trezor device to your computer using the included USB cable. Ensure that it is securely connected.
Step 2: Install Trezor Bridge
To configure your device, you will need to install the Trezor Bridge software. Visit the official Trezor website and download the appropriate version for your operating system.
Note: Trezor Bridge is available for Windows, macOS, and Linux.
Step 3: Configure Trezor Bridge
Once Trezor Bridge is installed, open the software and follow the on-screen instructions to set it up. Make sure to choose a strong password and enable any additional security features offered by Trezor.
Step 4: Create a Recovery Seed
Before using your Trezor wallet, you will be prompted to create a recovery seed. This seed is a sequence of words that can be used to restore your wallet in case your device is lost or damaged. Follow the prompts to generate and securely store your recovery seed.
Remember: Never share your recovery seed with anyone!
Step 5: Test Your Setup

Once your Trezor device is configured and your recovery seed is safely stored, it’s time to test your setup. Follow the instructions displayed on your Trezor screen to confirm that everything is working correctly.
Congratulations! Your Trezor wallet is now set up and ready to securely store your cryptocurrencies. Make sure to familiarize yourself with the wallet’s features and security measures to make the most of your device.
Get Started with Trezor Wallet
Are you ready to secure your cryptocurrencies with a Trezor hardware wallet? Follow these simple steps to get started with Trezor Wallet:
Step 1: Purchase a Trezor Device
The first step is to purchase a Trezor hardware wallet. Visit the official Trezor website or authorized resellers to buy your device.
Step 2: Set up your Trezor Wallet
Once you have your Trezor device, it’s time to set up your Trezor Wallet. Connect your Trezor to your computer using the provided USB cable.
Open the Trezor Wallet website and follow the instructions to install the required firmware. Make sure to verify the authenticity of the firmware by checking the security seal on your Trezor device.
After installing the firmware, you will be prompted to create a new wallet. Follow the on-screen instructions and choose a secure PIN code for your Trezor Wallet. Make sure to store your PIN code in a safe place.
Step 3: Backup your Recovery Seed
Once you have set up your Trezor Wallet, it’s important to create a backup of your recovery seed. This seed is the key to restoring your wallet in case your Trezor device gets lost or damaged.
During the setup process, you will be given a list of recovery words. Write down these words in the exact same order and keep them in a safe and secure location. Make sure to store the recovery seed offline and away from any digital threats.
Step 4: Send and Receive Cryptocurrencies
With your Trezor Wallet set up and backed up, you can now start sending and receiving cryptocurrencies. Use the Trezor Wallet interface to manage your assets and perform transactions securely.
To receive cryptocurrencies, simply provide the sender with your public address. To send cryptocurrencies, enter the recipient’s address and the amount you want to send.
Remember to always verify the transaction details on your Trezor device’s screen before confirming the transaction. This ensures that you are sending funds to the intended recipient.
That’s it! You are now ready to safely store and manage your cryptocurrencies using your Trezor Wallet. Enjoy the peace of mind that comes with knowing your digital assets are stored in a secure hardware wallet.
Secure Your Cryptocurrencies
When it comes to cryptocurrencies, security is of utmost importance. With the rising popularity and value of digital currencies, hackers and cybercriminals are constantly looking for ways to steal them. Therefore, it’s crucial to take necessary precautions to protect your investments.
One way to secure your cryptocurrencies is by using a hardware wallet such as Trezor. A hardware wallet is a physical device that stores your private keys offline, away from potential online threats. This adds an extra layer of security compared to keeping your keys on a computer or smartphone.
Here are some steps you can take to further enhance the security of your Trezor wallet:
1. Set a Strong PIN: When setting up your Trezor device, make sure to choose a strong PIN. Avoid using easily guessable combinations and opt for a PIN that is at least 8 characters long, including a mix of numbers and special characters.
2. Enable Two-Factor Authentication: To provide additional protection, enable two-factor authentication (2FA) on your Trezor wallet. This requires you to enter a unique code from an authenticator app or receive a code via SMS to log in to your wallet.
3. Keep your Recovery Seed Secure: Your recovery seed is a list of 24 words that can be used to recover your wallet in case your device is lost or stolen. It’s important to write down this seed on a piece of paper and store it in a safe place. Avoid taking screenshots or storing it digitally, as it increases the risk of being accessed by unauthorized individuals.
4. Regularly Update Firmware: Stay up to date with the latest firmware updates provided by Trezor. These updates often include security patches and bug fixes, so it’s crucial to keep your device’s software updated to ensure maximum security.
By following these steps and implementing extra security measures, you can significantly reduce the risk of losing your cryptocurrencies to hackers or other malicious actors. Remember, investing in a hardware wallet like Trezor is an investment in the security of your digital assets.
Q&A:
What is Trezor Wallet?
Trezor Wallet is a hardware cryptocurrency wallet that allows users to securely store their digital assets offline.
Is Trezor Wallet compatible with all cryptocurrencies?
Trezor Wallet supports a wide range of cryptocurrencies, including Bitcoin, Ethereum, Litecoin, and many others.
How do I set up my Trezor Wallet?
Setting up your Trezor Wallet is easy. First, connect your device to your computer via USB. Then follow the instructions on the device’s screen to initialize the wallet and create a new seed. Make sure to write down the seed and keep it in a safe place.
Can I use Trezor Wallet with my mobile device?
Yes, you can use Trezor Wallet with your mobile device. Simply download the Trezor app from the App Store or Google Play and connect your Trezor device to your phone or tablet using an OTG cable.
How secure is Trezor Wallet?
Trezor Wallet is highly secure. It uses advanced encryption and is designed to protect your private keys from malware and hackers. Additionally, all transactions must be confirmed on the device’s screen, providing an extra layer of security.